Craig Pindell, Fine Art Photographer
All work copyright Craig Pindell, 2025
Building a 6x17 Camera
In 2016 I decided to back Two Fourths DIY617
Kick Starter project, paying about $185 for a kit that would let me use
two lenses on the wood and plastic 6x17 format camera.
I saw this as a point and shoot
camera, requiring less effort that the 4x5 and 8x10, and much less
expensive than the other 6x17 cameras that are available.
In my photography process, point and
shoot still requires a tripod and a light meter, and taking notes for
each exposure.
I
can’t really explain why I decided to back this project. I already had a
Da Yi 6x17 back for my Linhof 4x5, and a Da Yi 6x17 back for a 5x7 camera,
which was to be used with my 8x10 Bomm camera when it was completed.
I suppose I was thinking that 6x17 was
my favorite format and no one has too many cameras in a favorite format?
Or maybe I thought the Two Fourths
would be easier and more portable than the Linhof or Bomm?
Maybe I thought a $185 6x17 camera was
too good to be true? I am just not sure why I did it.
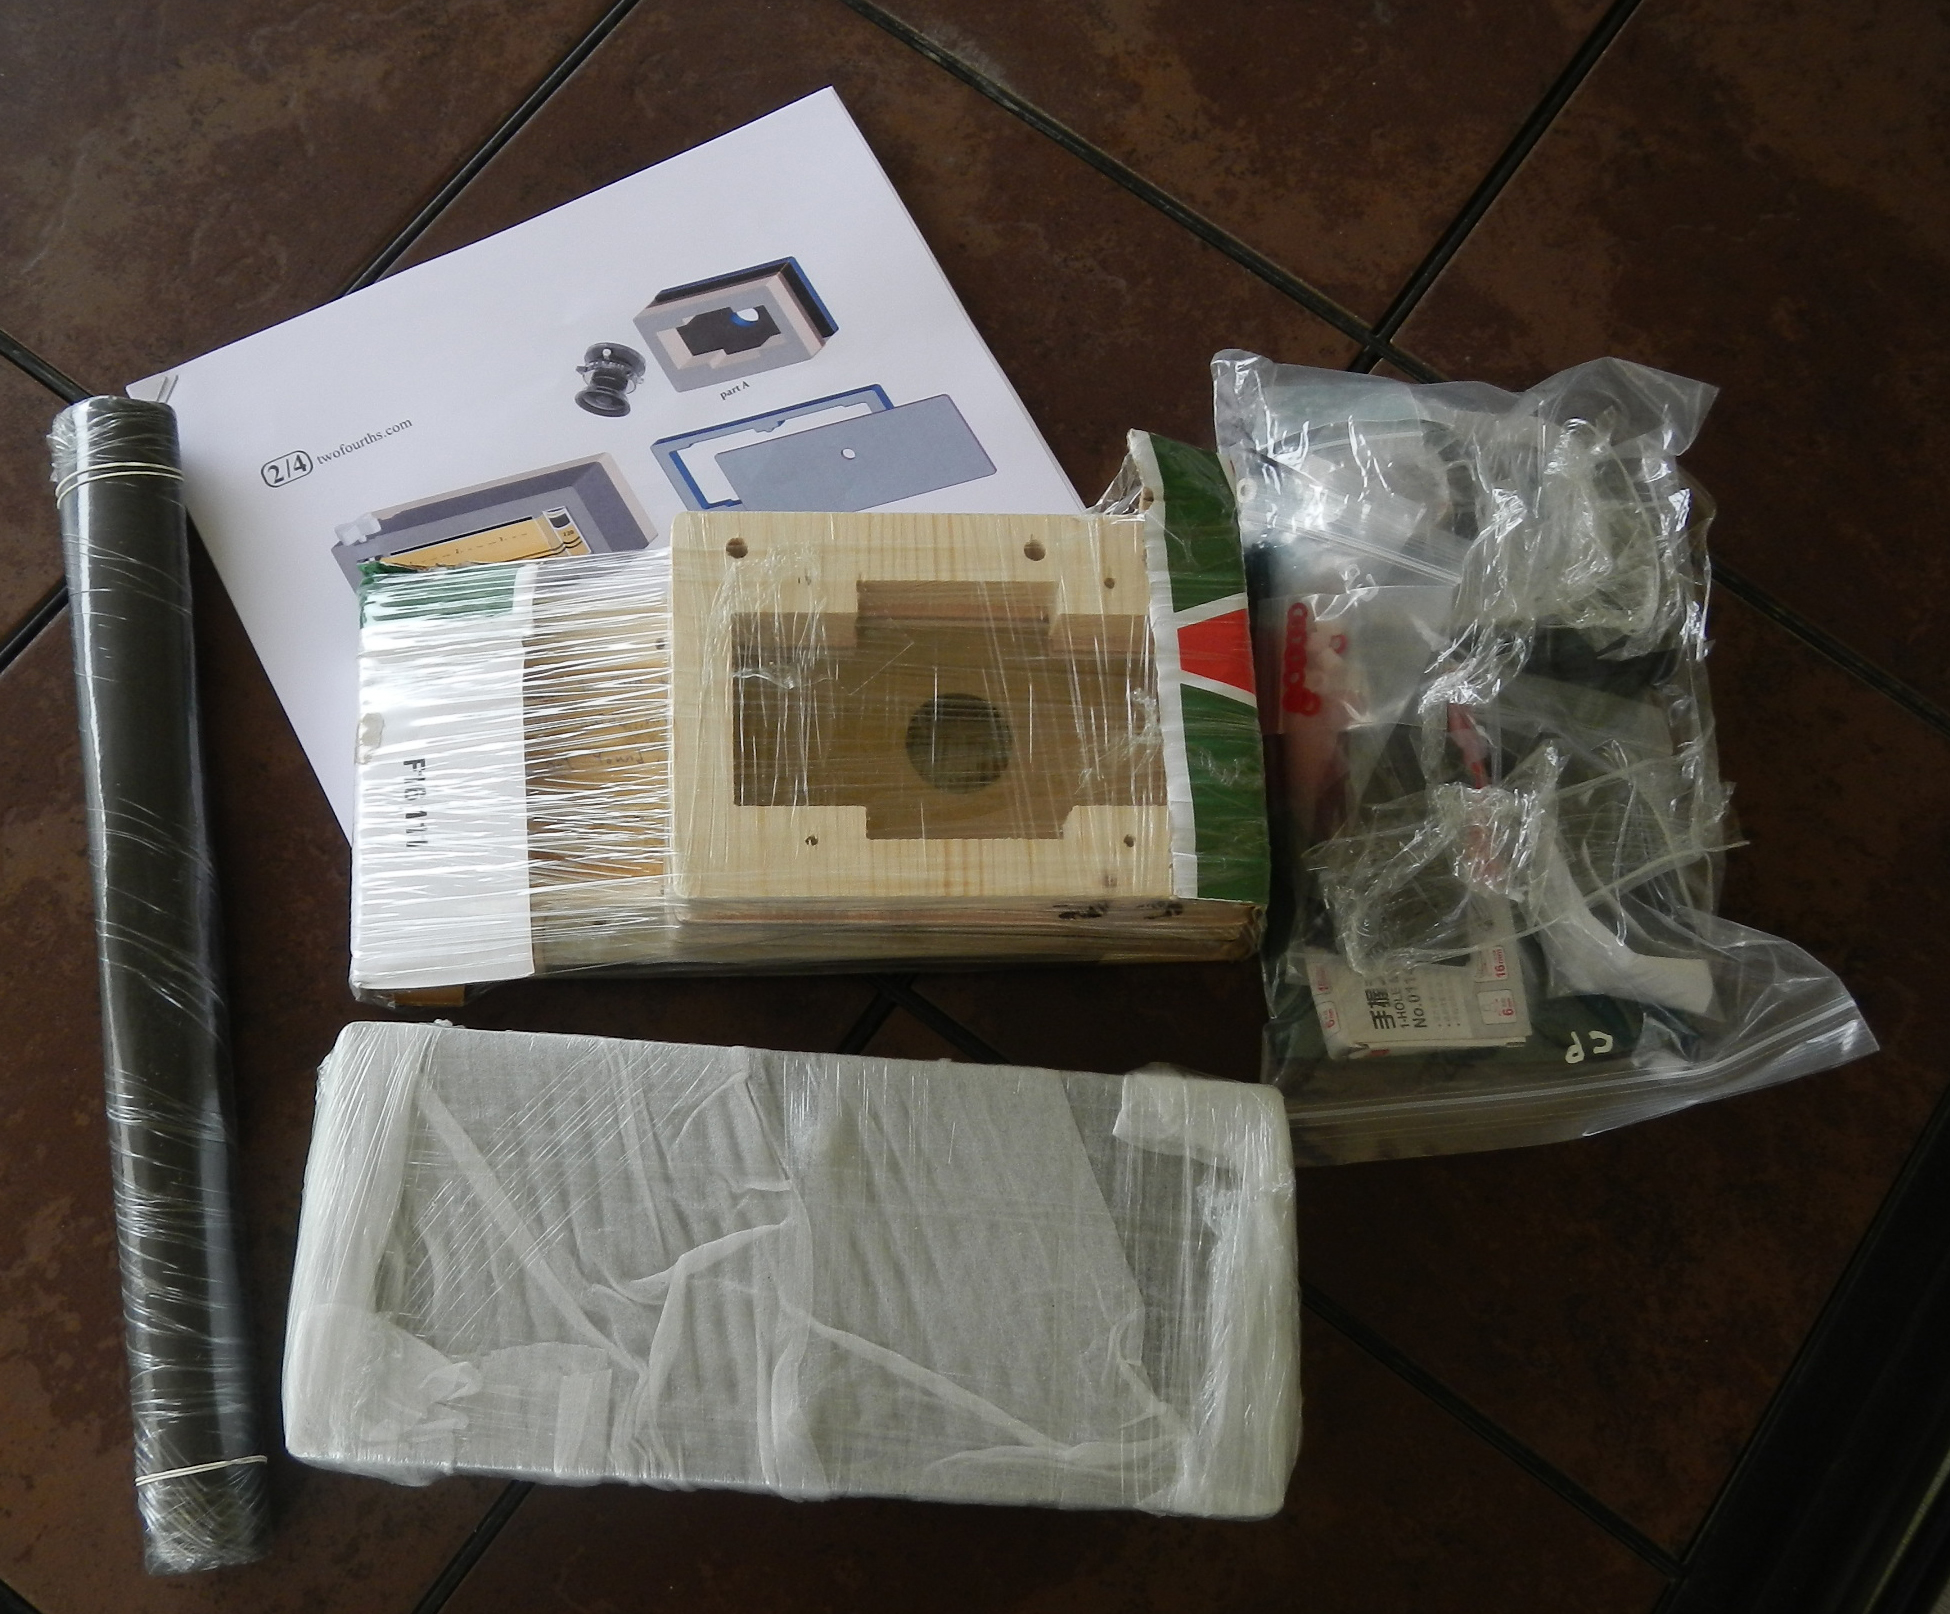
When the kit first arrived, I was
surprised how much I liked it.
The pieces were cleanly cut (I believe
they were all CNC cut) and everything fit together very well when I did
a quick mock-up.
I was surprised that screws were used
to hold the film rolls in place and the winding knob assembly looked a
bit crude,
but I thought if need be I could build
something better and it wouldn’t cost much.
Having
too much equipment on hand is one of my many bad character flaws, and
when I decided to buy this camera, I knew I had large format lenses on
hand that would work well.
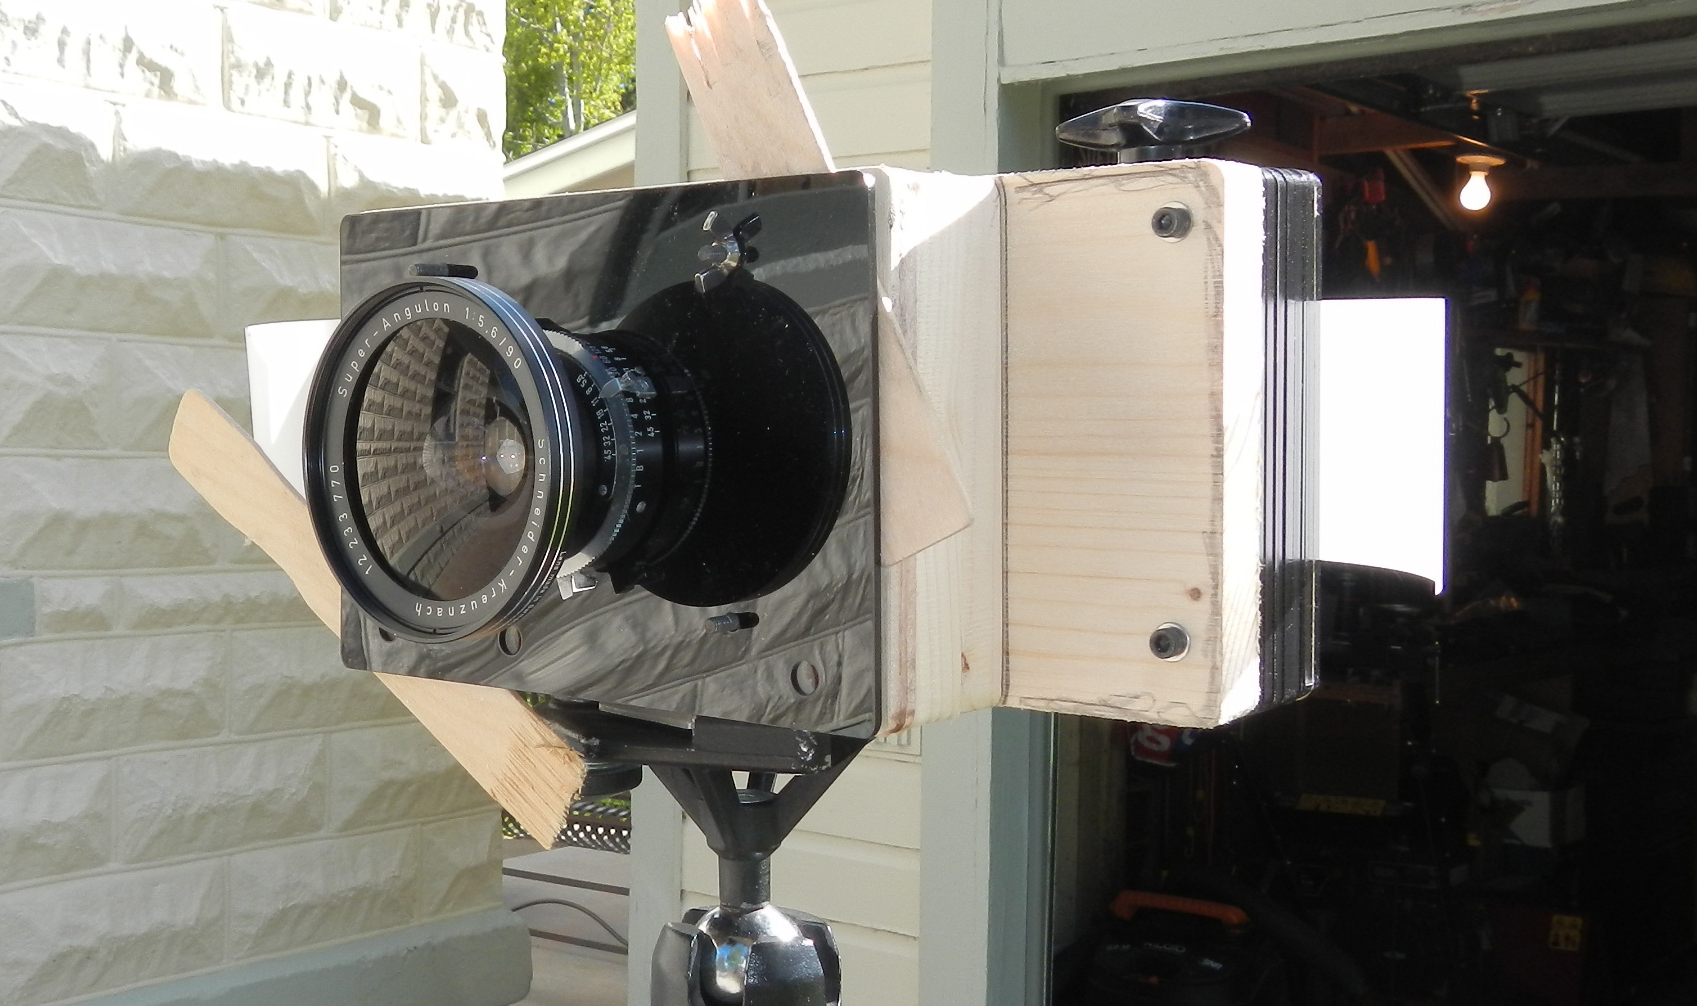
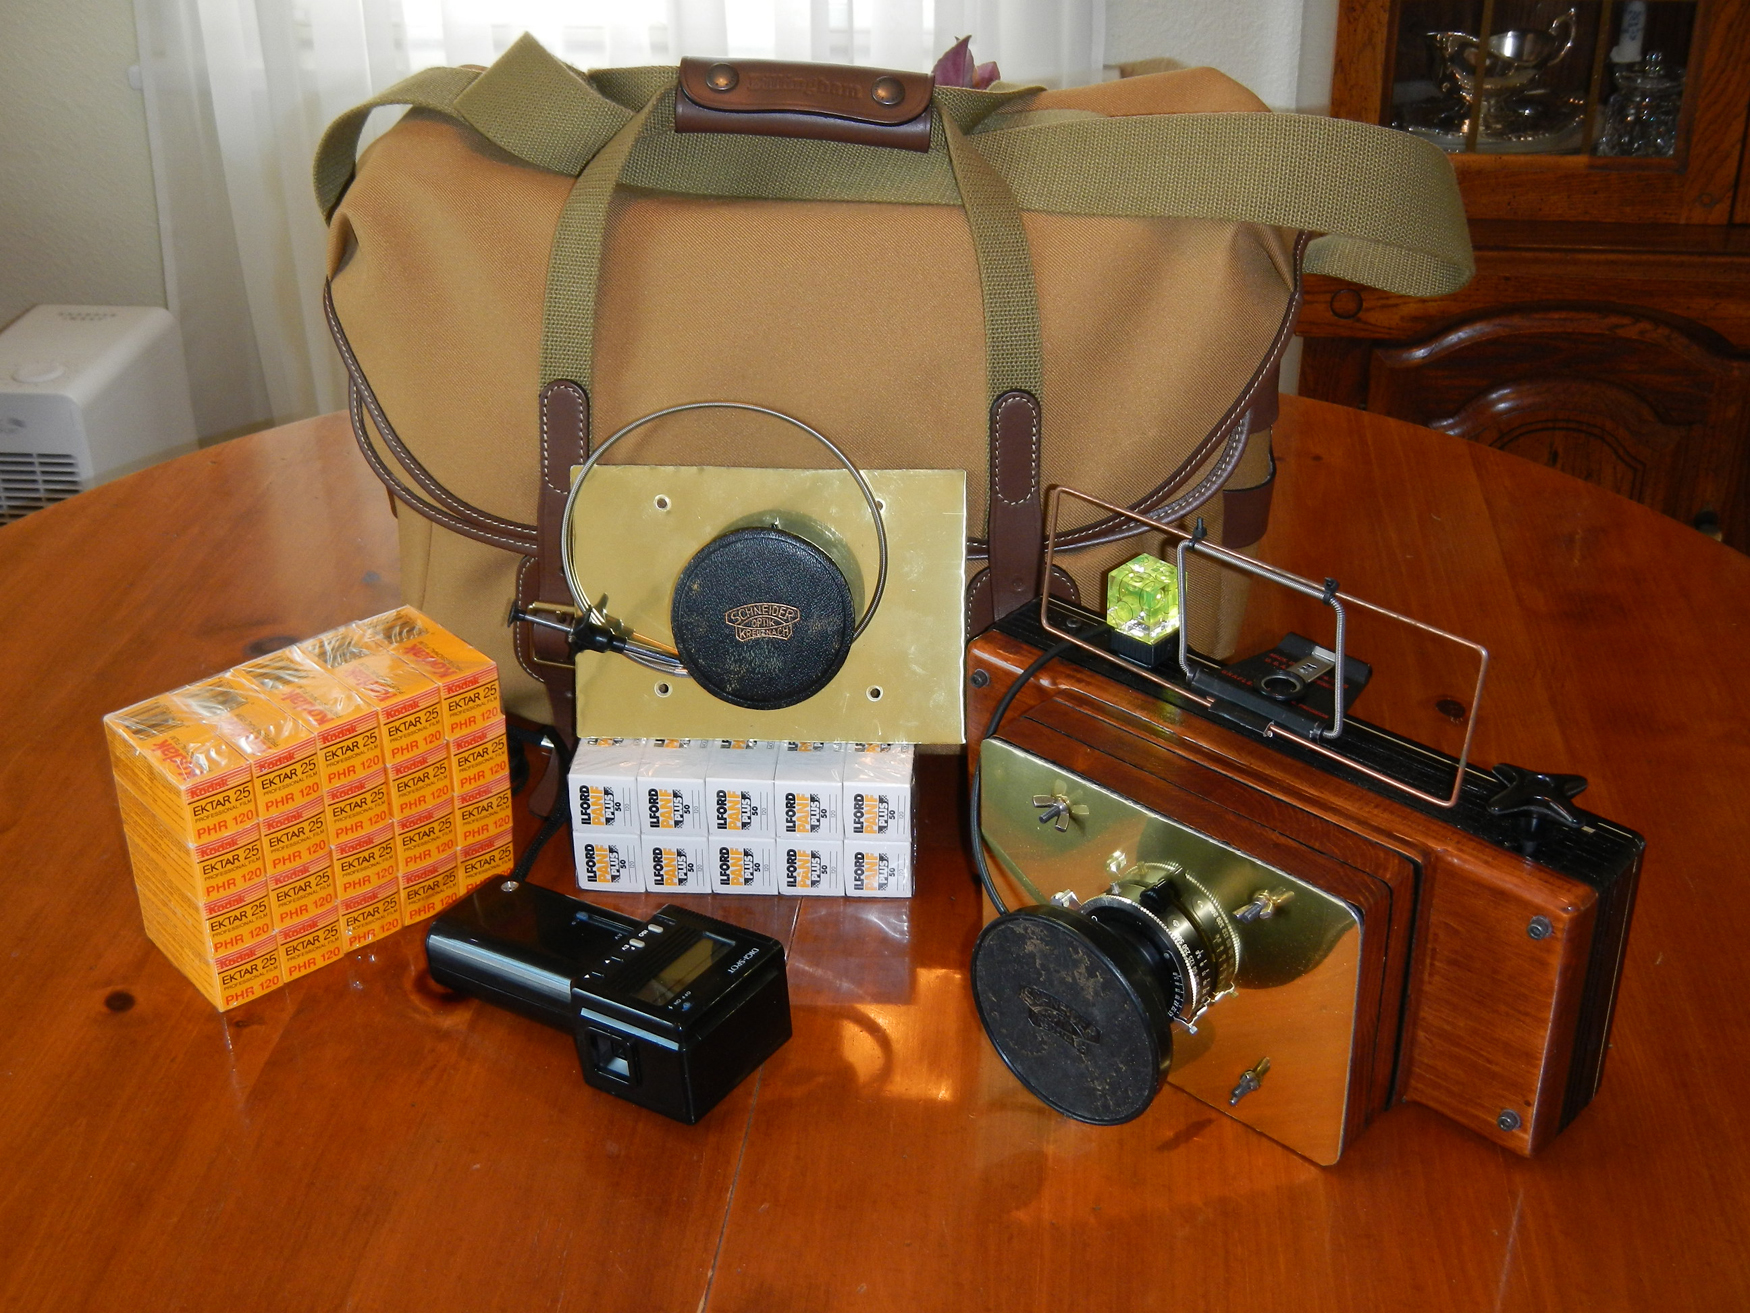
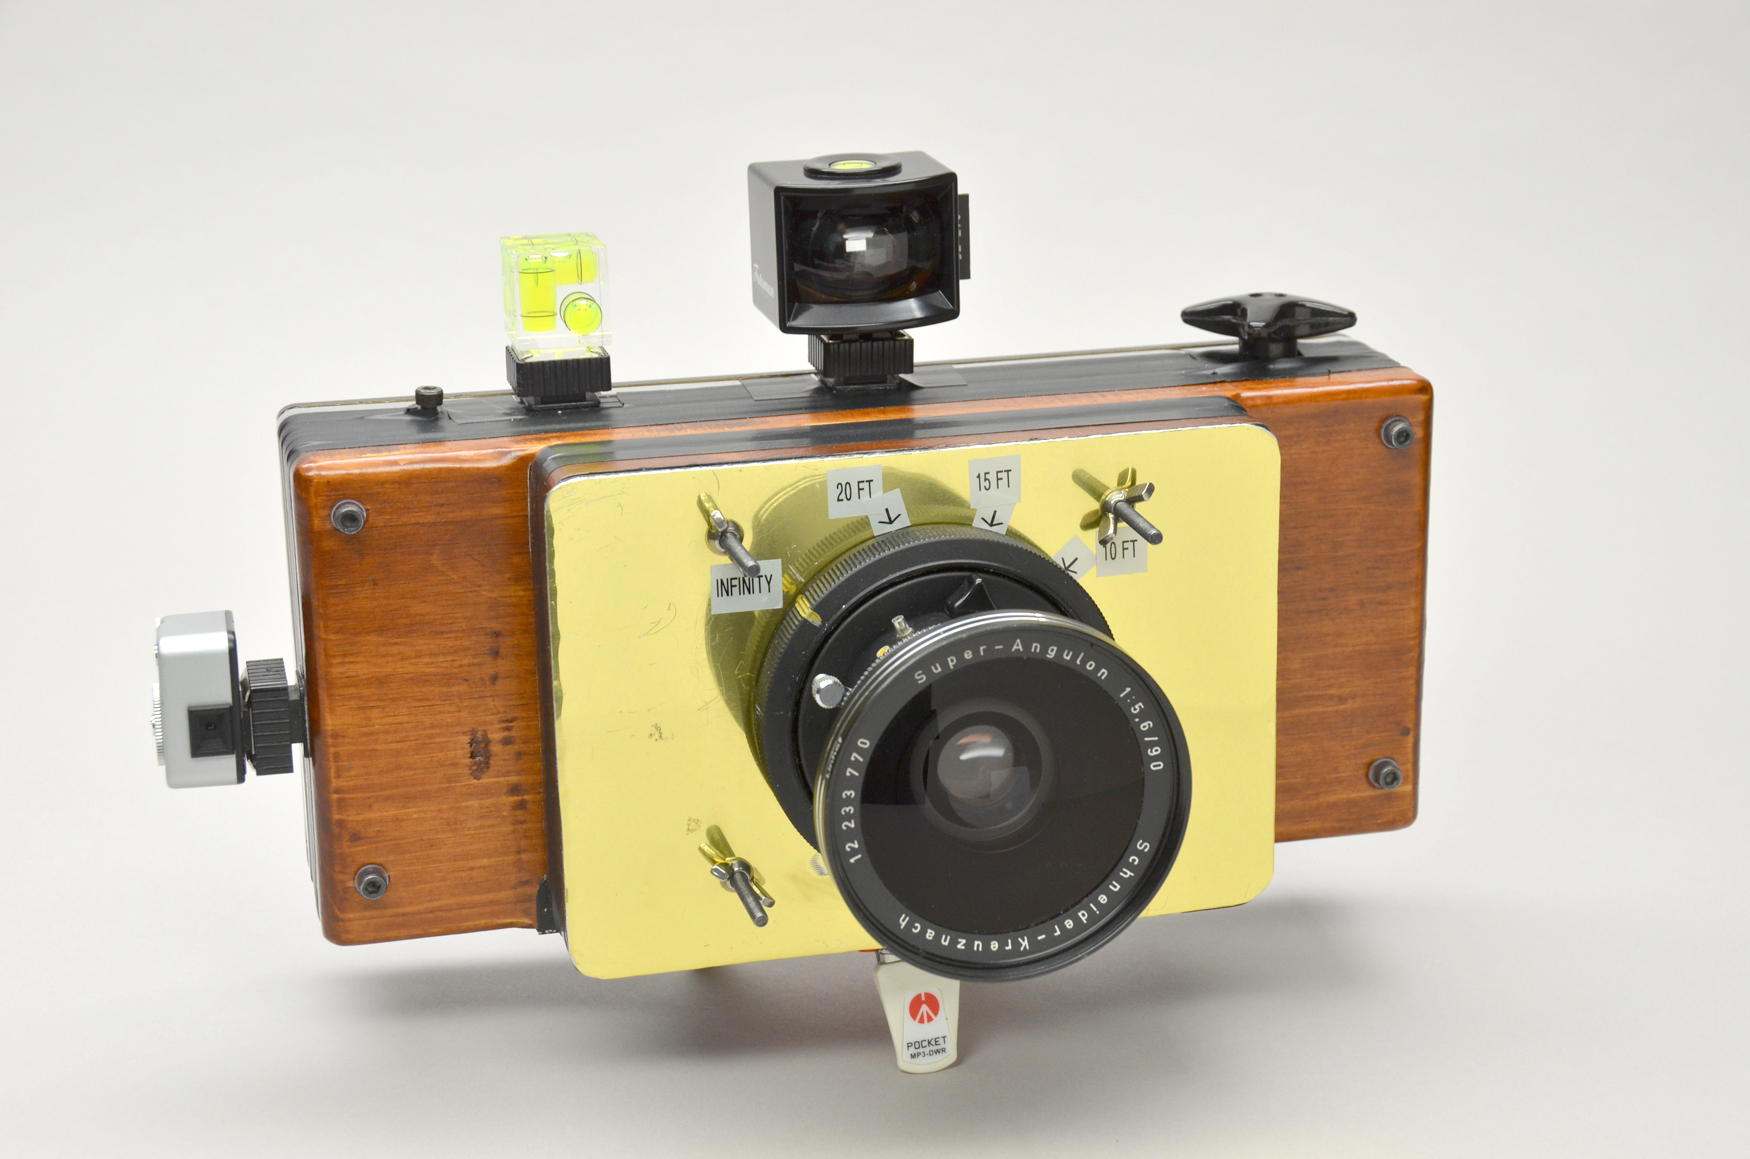
The main lens would be a 90mm f/5.6
Schneider Super Angulon.
This will be a fairly wide lens on the
6x17 format, (approximately equal to 22mm lens for 35mm photography),
but
having used the 90mm for 6x17 on the Linhof, I knew I liked the look and
the lens wasn’t being used, so it was a natural choice.
I also had a 58mm Schneider Super
Angulon (approximately equal to 17mm lens for 35mm photography) that I
didn’t use much once I purchased a 47mm, so even though I knew there
would be some vignetting, the 58mm was going to be my second lens. When
I use the 58mm I expect to have a 6x14 useable image rather than 6x17 due
to the vignetting.
I also have a center filter for this
lens so there is no fall off.
The Two Fourths kit arrived when I expected
it, (May 2017) and like a child, I tore open the packaging and starting
test fitting parts and pieces.
In almost no time, I had mocked up the
camera.
The design is simple.
Everything made sense to me, so why
not go ahead and see what I could do.
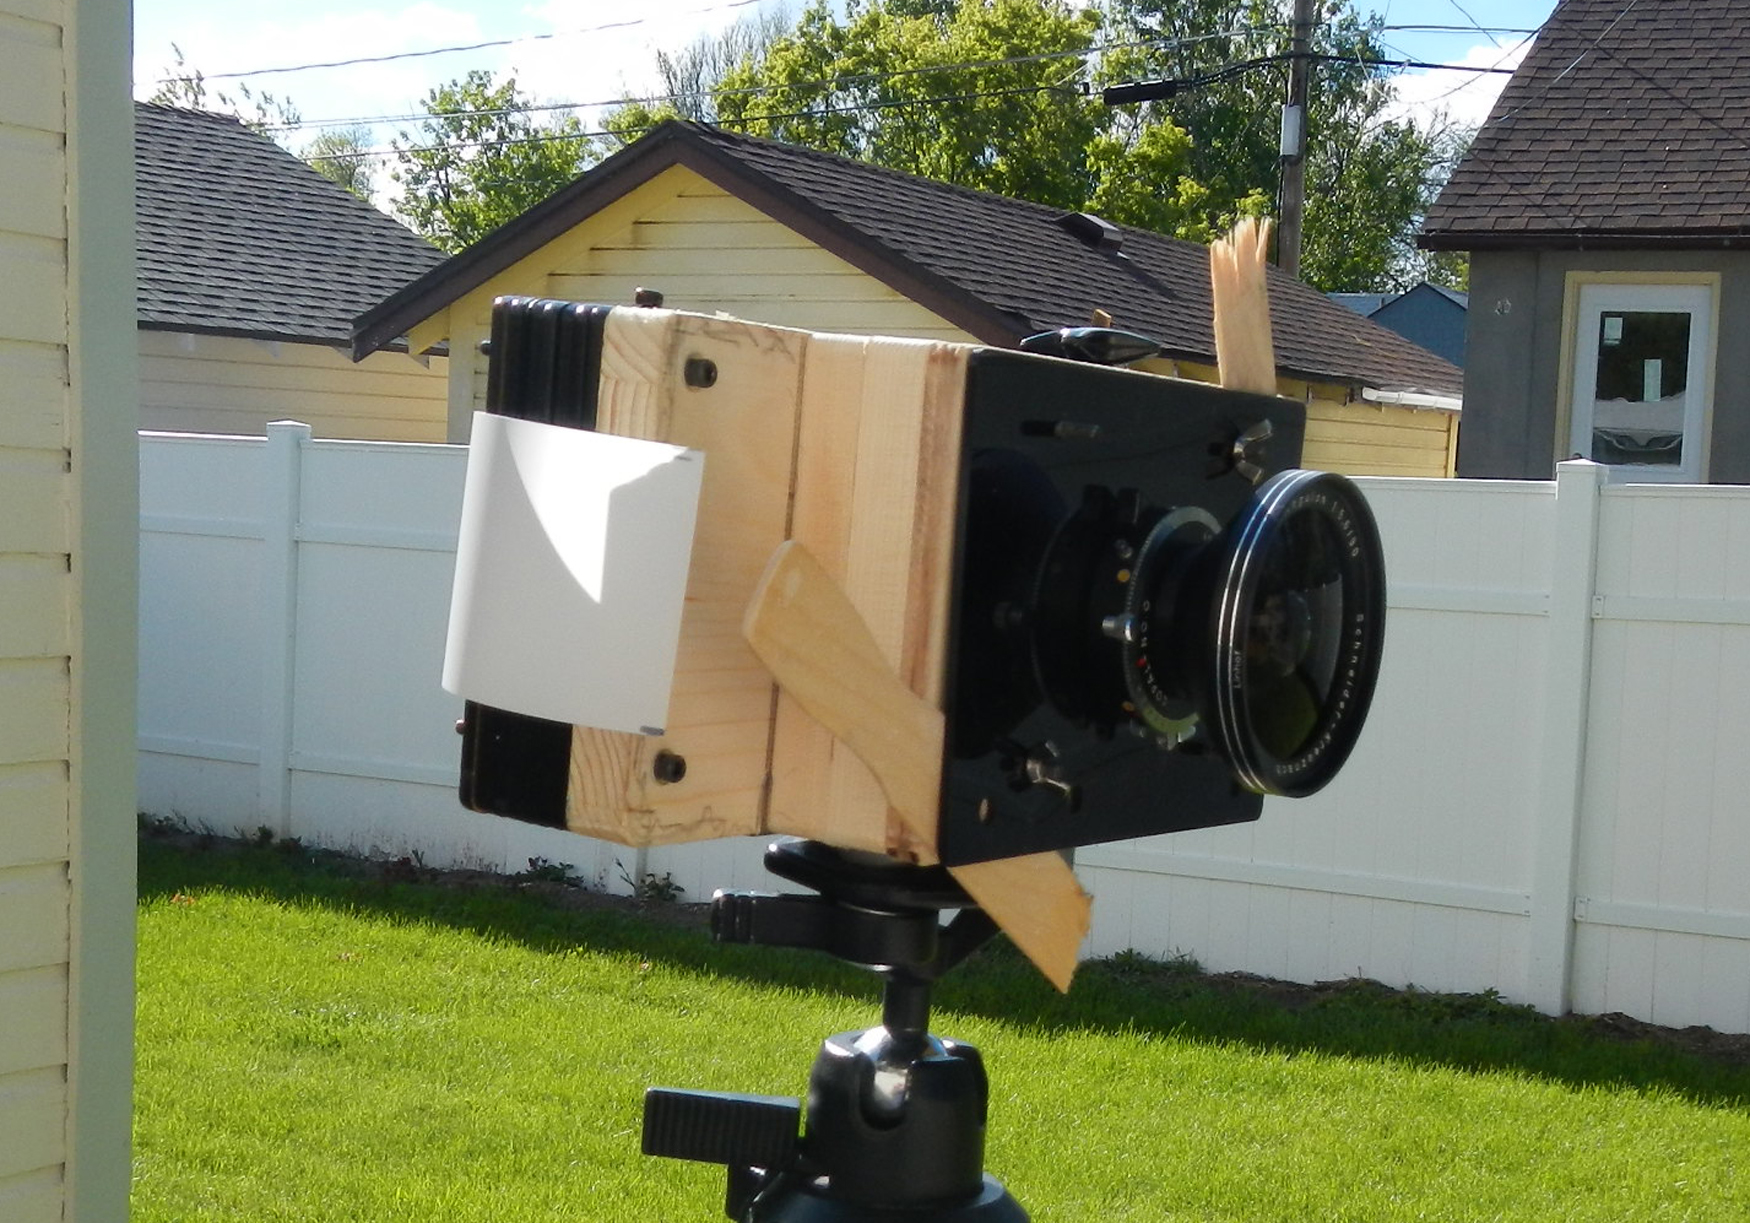
The Two Fourths camera mocked up
with the 90mm lens Complete with paint stirring sticks for spacers, and
tracing paper for a ground glass.
I was sure from the mock up that this was
going to work just fine.
In the early 1980s, I had purchased a
4x5 kit camera from Calumet, and in my haste assembling that, I never
did finish the camera properly.
Eventually the cherry wood of that
camera cracked and discolored.
Being older and wiser (?) now, I
decided to take my time and build this project correctly.
I carefully determined the best spacing for
each lens and then decided to refine the fit and feel of the camera.
This included rounding the edges of
the wood portion of the camera.
I marked the areas I thought would
benefit from my rudimentary woodworking skills and went to work.

I used my router table with a round over bit,
easing the edges that were outside of the lens board mounting areas, and
quite a bit of sanding to smooth out everything and remove any fuzzy
edges.
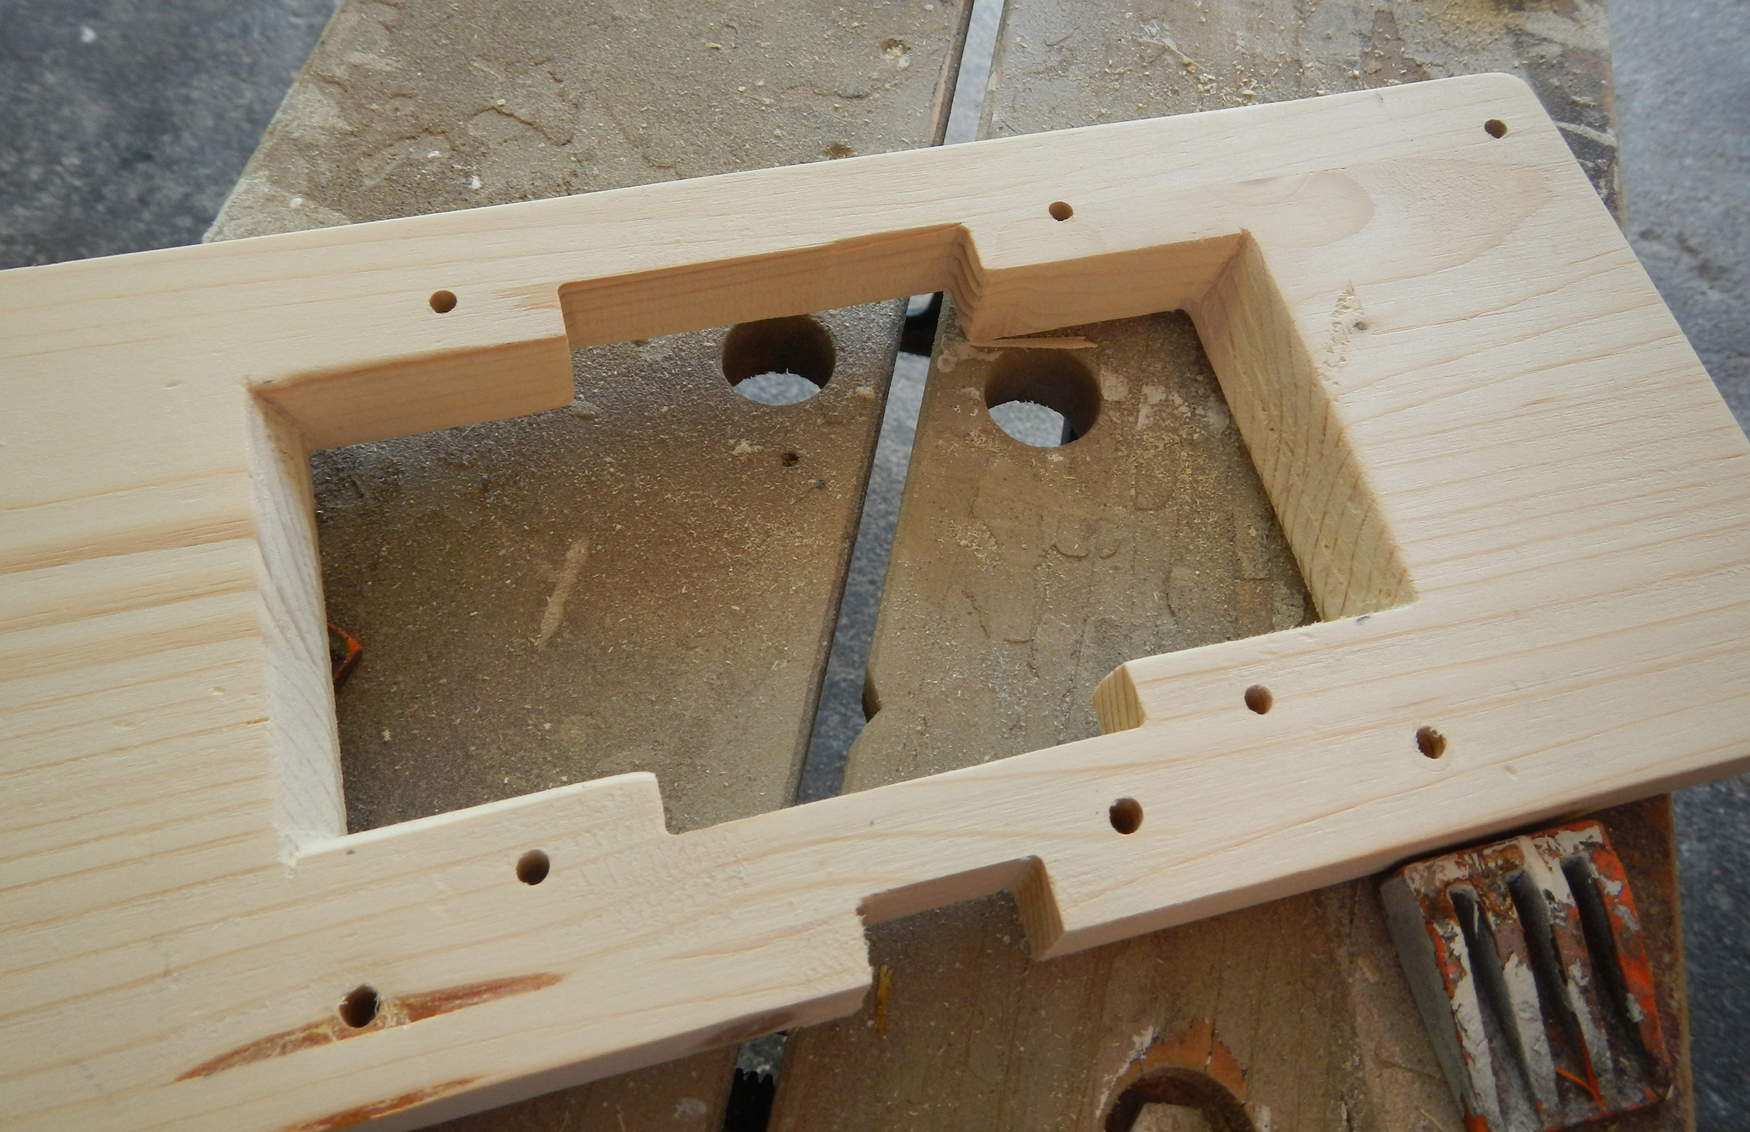
I also opened up the area inside of
the camera expecting that using a 58mm wide angle lens may be
problematic, in terms of vignetting.
In hindsight, I doubt that would have
been the case.
I was careful to not cut, file, or
sand close to any edges or holes that might lead to light leaks.
I used Minwax PolyShade to finish
the camera.
This is a combination stain and
polyurethane product that I had on hand, and I felt the polyurethane
would help make the camera much more weather proof.
I also decided to add a more finished
look to the lens boards, something more fitting a mostly wooden camera.
I found and aluminum kick plate for a
storm door that had a brass finish. It was inexpensive and just the
finish I wanted.
I knew I needed to make some sort
of framing guide so I would have some idea of what I was shooting.
I used the framing apparatus from my
Graphlex XLSW and modified it by bending a welding rod to match the 6x17
format.
I attached this to the camera via a
hot shoe epoxied to the camera.
I added another hot shoe to
utilize a plastic bubble level to help camera alignment.
After sanding and a couple of coats
of finish, I assembled the camera, following the Two Fourths
online instructions.
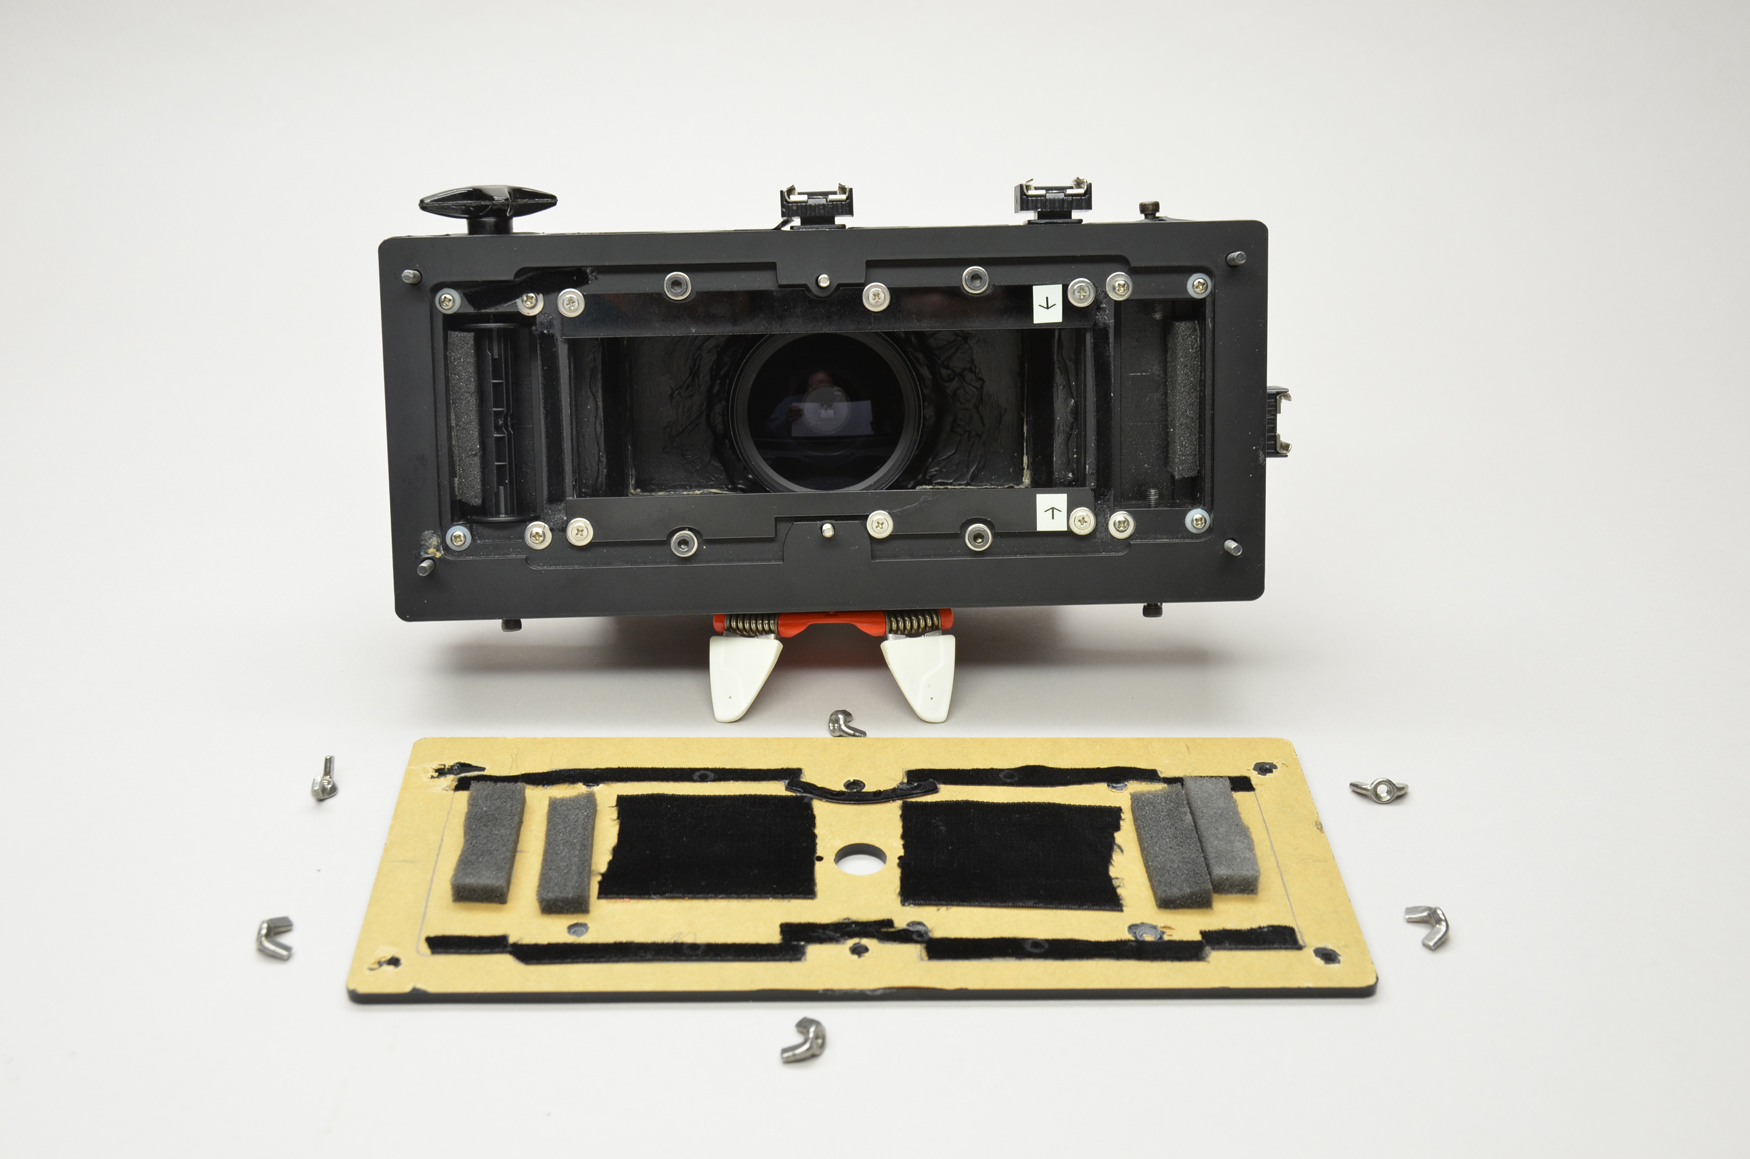
I took the time to cut and insert the
provided black out paper using the provided double stick tape, and to
apply the velvet ribbon in all of the places outlined.
Ready for testing!
The test didn’t go so well.
I expected a light leak or two, but
the first rolls were horrible.
The frame edges were uneven and there
was velvet ribbon fur all along the film edges.
Portions of the image were in focus
and portions were out of focus.
When I saw the first images, I thought
the project was a bust.
So I did what any stubborn fool would
do.
I went to work to fix it.
For me, the logical course was to fix one
problem at a time, and to start with the easiest problem.
First, I removed the velvet ribbon
in any area that could be included in the frame.
The adhesive on the ribbon was messy
and took longer than expected.
In some places total removal of
the adhesive has not been accomplished.
As I worked on the velvet ribbon I realized
that it was also contributing to the issues with film flatness.
In places, especially at both ends,
the ribbon was causing the film to bow as it passed over the ribbon.
I was concerned that the film dragging
on the plastic of the camera would cause scratches, so I wanted there to
be something soft.
A trip to the sewing store helped me
to find a much thinner and softer velvet ribbon that exactly fit the
area the film passed over.
Problems solved!
Another test showed that I was much
too optimistic.
There were still focus issues and
light leak issues.
Also the new ribbon I had installed
was too large and showed in the negative.
The adhesive from the removed ribbon
had threads that showed in the negative as well.
The light leaks were even worse than
before.
At this point I had invested several months
in this project, not full-time of course, but still a lot of time and
effort.
I had exposed and developed quite a
bit of film.
As my frustration level was quite
high, I put the project aside for a few months.
A few of the photographers from
Colorado were getting together for breakfast and a photo walk, and I
decided to try to use the Two Fourths.
I cleaned and cleaned the adhesive.
I took the camera into the darkroom
and using a bright flashlight, I tried to block every light leak I could
find.
During this process, I removed all of
the construction paper, and painted the inside of the camera with liquid
electrical tape. In the past I had used the liquid electrical tape for
emergency bellows repair on view cameras. It is flexible and opaque and
easy to apply. The next test roll showed a vast improvement, but still
not perfect.
I
added some of the wide velvet ribbon to the camera back where it touched
the film transport paper.
This seemed to fix the film flatness/
focus issues.
Back into the darkroom with the
flashlight, I was more determined than ever to figure this out.
As I was shining the light on every
single seam, over and over, I found that the multiple plastic sheets
that formed the areas that held the film were actually allowing a faint
amount of light to pass through.
This helped me understand the overall
fog I would sometimes have. This fog seemed to happen most often when
there was time between exposures.
There was no way to fix this with the
liquid electrical tape, so I had to find a new cure.
I wrapped the exposed part of the
plastic sheets with a black vinyl electrical tape on the outside of the
camera.
This mostly solved the problem, except
for an area between the two plastic sheets closest to the camera back.
Because of the film guides and
transport areas, these two sheets were cut differently and allowed
leaking.
The electrical tape did not solve the
problem.
I happened to be in the auto parts
store and decided to see if there was a more opaque tape that would
work.
I found some ¼ inch metallic pin
striping tape that was opaque and added a nice finishing touch to the
camera.
The
photo walk was a great time and I was able to make a few photos I liked,
but there were still light leaks, although fewer light leaks when I used
the 58mm.
I felt that the 90mm had more layers of
spacers so the light leaks had to have been coming from these layers.
I put extra coats of liquid electrical
tape on these areas, but it had no effect.
No matter what I tried, I just could
not find the source of the leaks.
I also still had occasional issues with
overall fogging on negatives, but it did not match the frame edges, so I
knew it was from the film area not the lens area.
I searched all of the areas around
that part of the camera but could not sort it out.
I finally removed the lens from the
camera and installed the back, then shined the flashlight all around the
back.
It only took a few moments to figure
out the screws holding the film guides in place were keeping the back
from fitting into the correct position.
The screw heads had scratched the back
enough that I could see where I had to remove some of the material, and
after just a few minutes on the drill press, that problem was solved.
But now a new problem appeared.
Something was causing lines in the lighter
areas of the negatives.
I tried changing the velvet ribbon, I
tried removing the ribbon entirely, I changed the foam I had put in the
keep the rolls tight, even though it only touched the paper side and not
the film side.
I suspected that correcting the
interference issue with the screws holding the film guides in place had
somehow changed the pressure on the film, and was creating the lines on
the film. I didn’t see scratches, but there were definitely lines in the
prints and scans.
After
several rolls, I decided this was the end.
I had invested more than enough.
I had worked on this camera from May
2017 to February of 2018.
Once I put the camera away, I didn’t give it
much more thought.
I had my 6x17 back for the 4x5 camera
and in September 2018 my Bomm 8x10 arrived and it had a custom made 5x7
back so I could use the 5x7 DaYi 617 on it.
In the grand scheme of things, while
it would have been fun to have been successful building the Two Fourths
Camera, it was not the end of
the world that I could not get it to work.
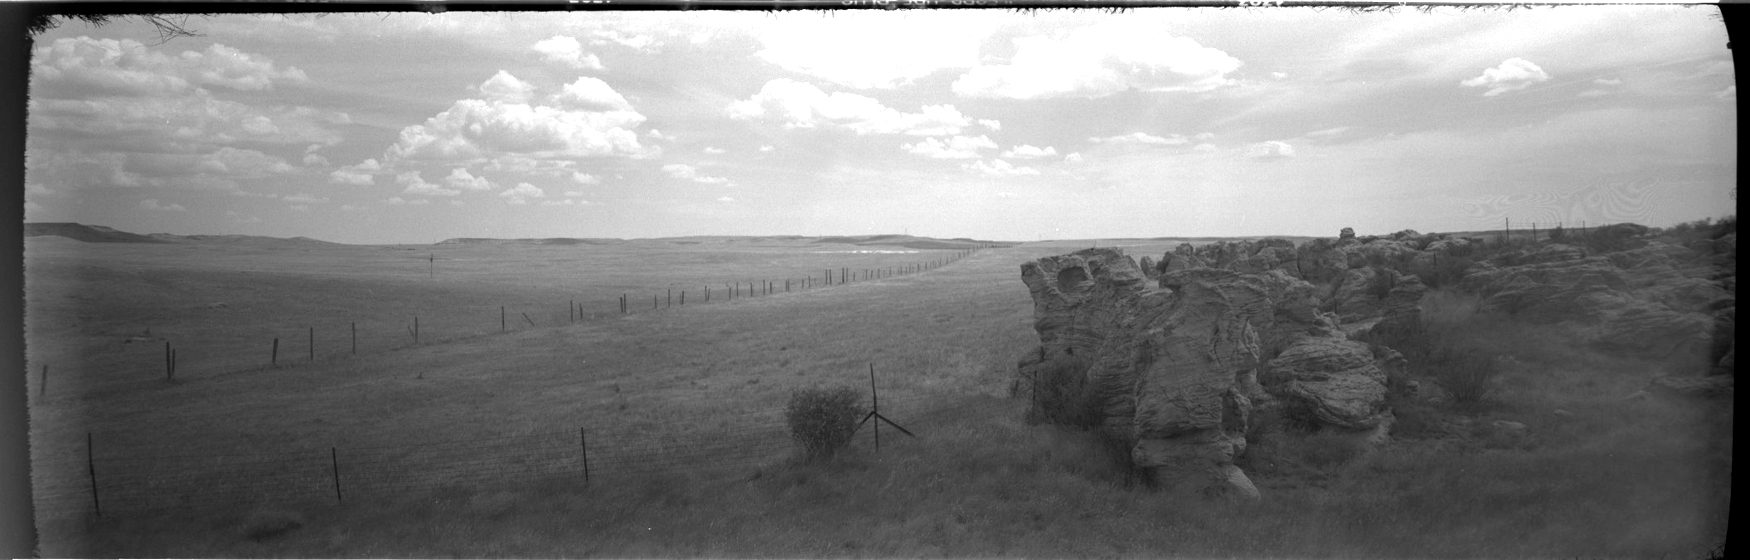
Fast forward to September 2019, and during a Twitter conversation about the problems Ilford had with Pan F+ film, I had a ”light bulb moment”. I knew I had some of the defective film, and had found problems with it when I was using the 6x17 back on my Bomm camera. I pulled out one of the defective negatives, and compared it to my last negatives from the Two Fourths camera. This image is from the Bomm, the image above was from the Two Fourths. Both on Pan F+ film.
The lines in the sky on both somewhat match.
All the time I was thinking the
problem was with the film transport on the Two Fourths it was the film!
The project was back on! I replaced
the velvet ribbon I had removed and exposed a roll of TMax and there
were no lines.
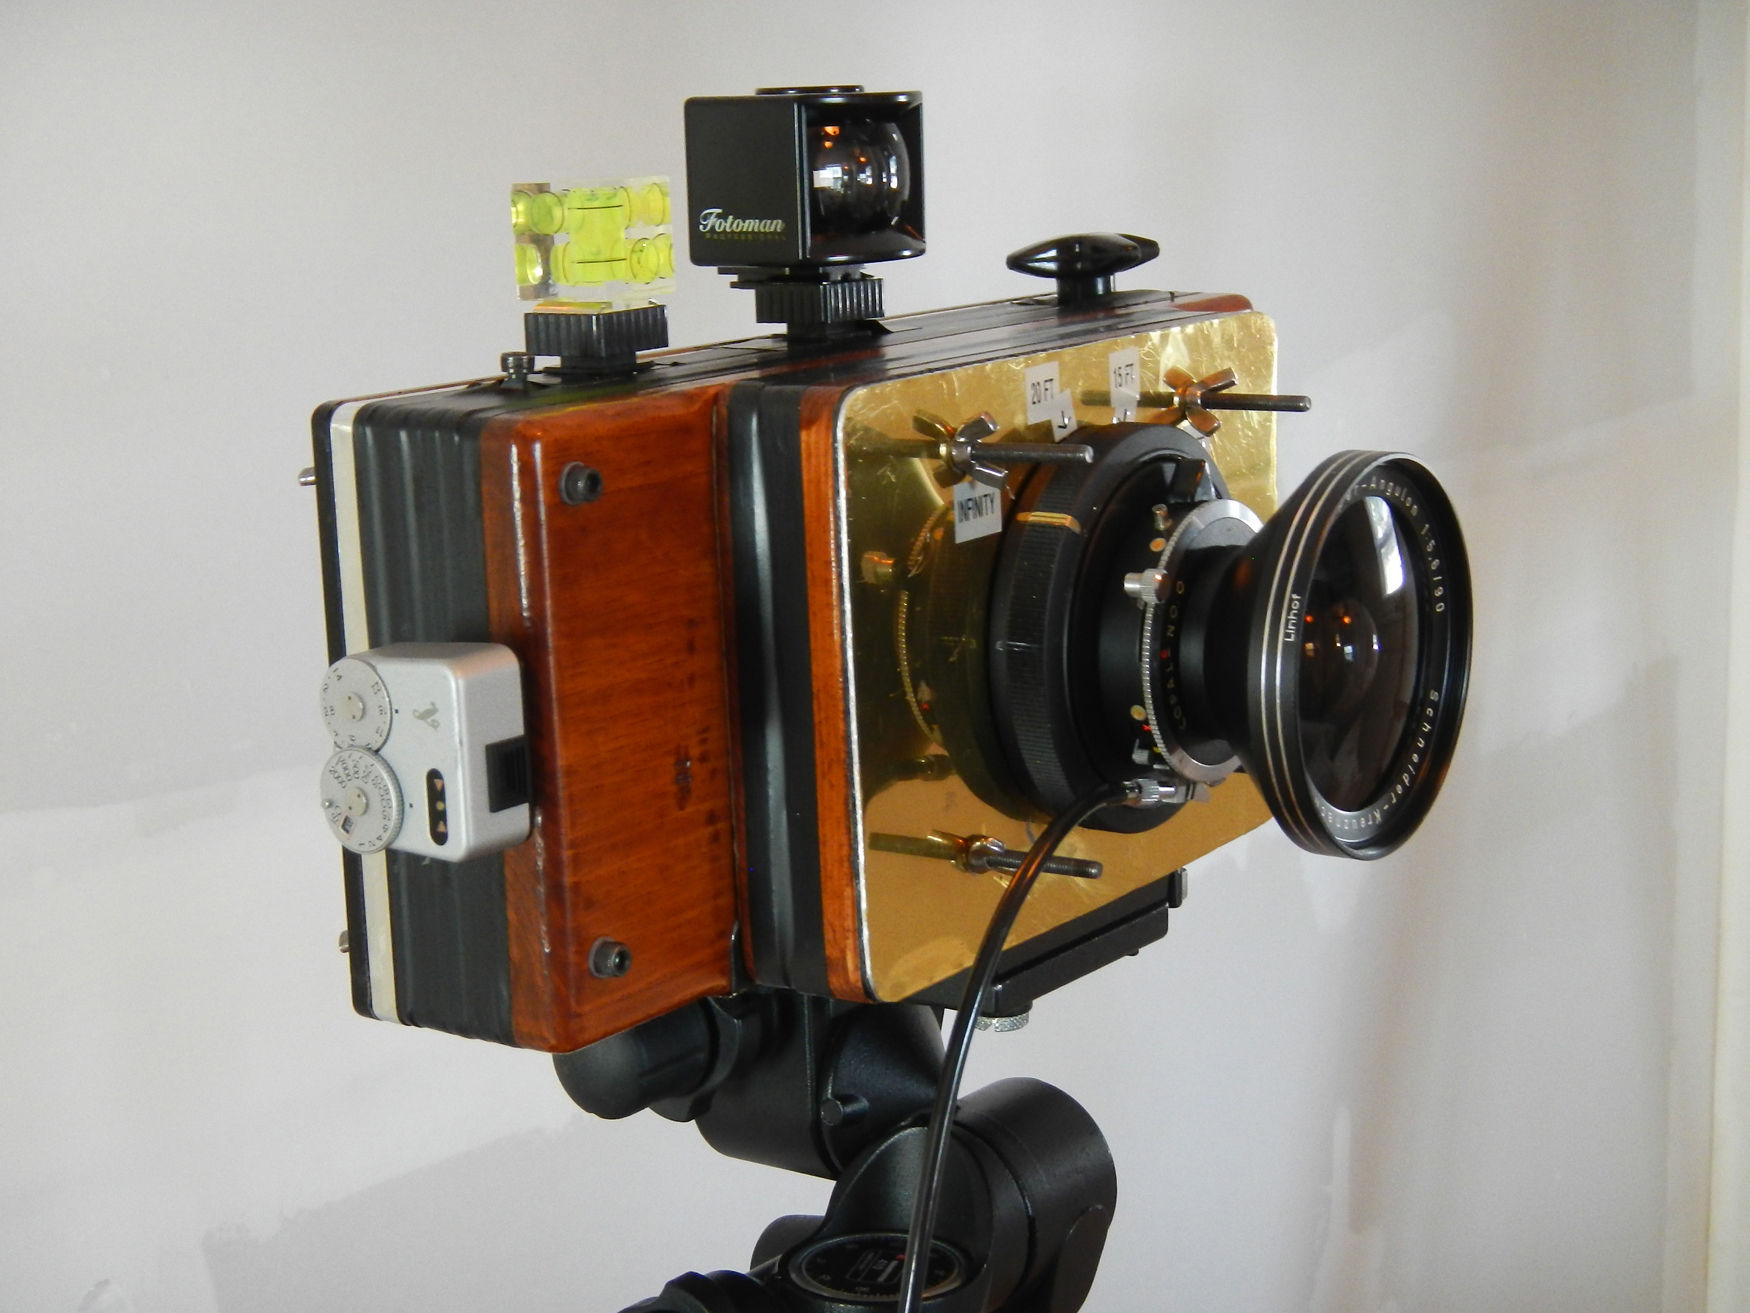
When I was trying to fix the problems with the light leaks between the layers on the 90mm lens board, I had thought that a helicoid focus device would eliminate some of the seams and would also allow me to focus the camera, somewhat. I found a device I thought would work, and purchased it in 2017. I installed the device in the lens board. Using the same tracing paper for a ground glass, I sorted out the correct spacer arrangement so the helicoid would focus at infinity. Again there were a couple of light leaks, so I applied even more of the liquid electrical tape to the interior of the lens board.
 |
 |
I
replaced the wire view finder with a Fotoman Professional 617
optical finder.
It is much smaller and easier to use.
I added another hotshoe to the end of
the camera so I could utilize my Voigtlander light meter.
I expect to use this camera as more of
a point and shoot camera, so spot metering each scene wouldn’t always
fit that spontaneous method very well.
I am happy with the results at this
point.
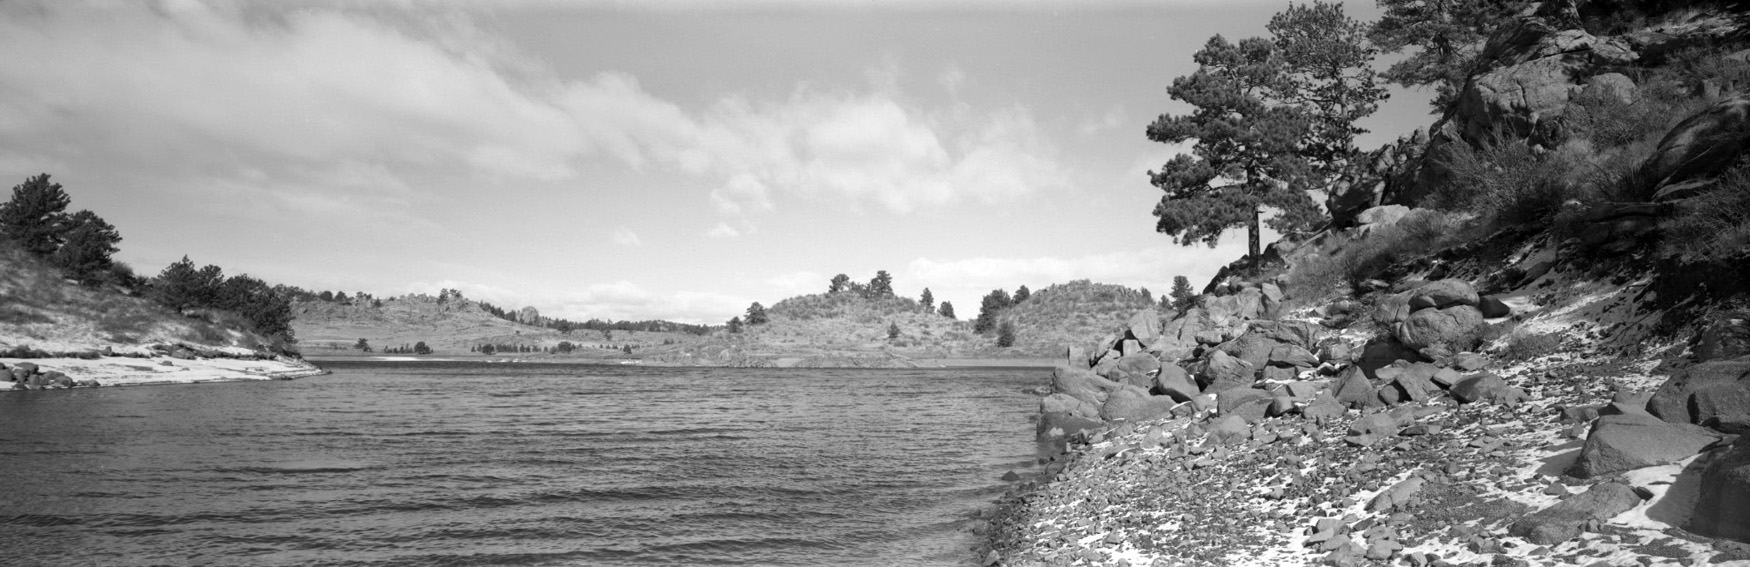
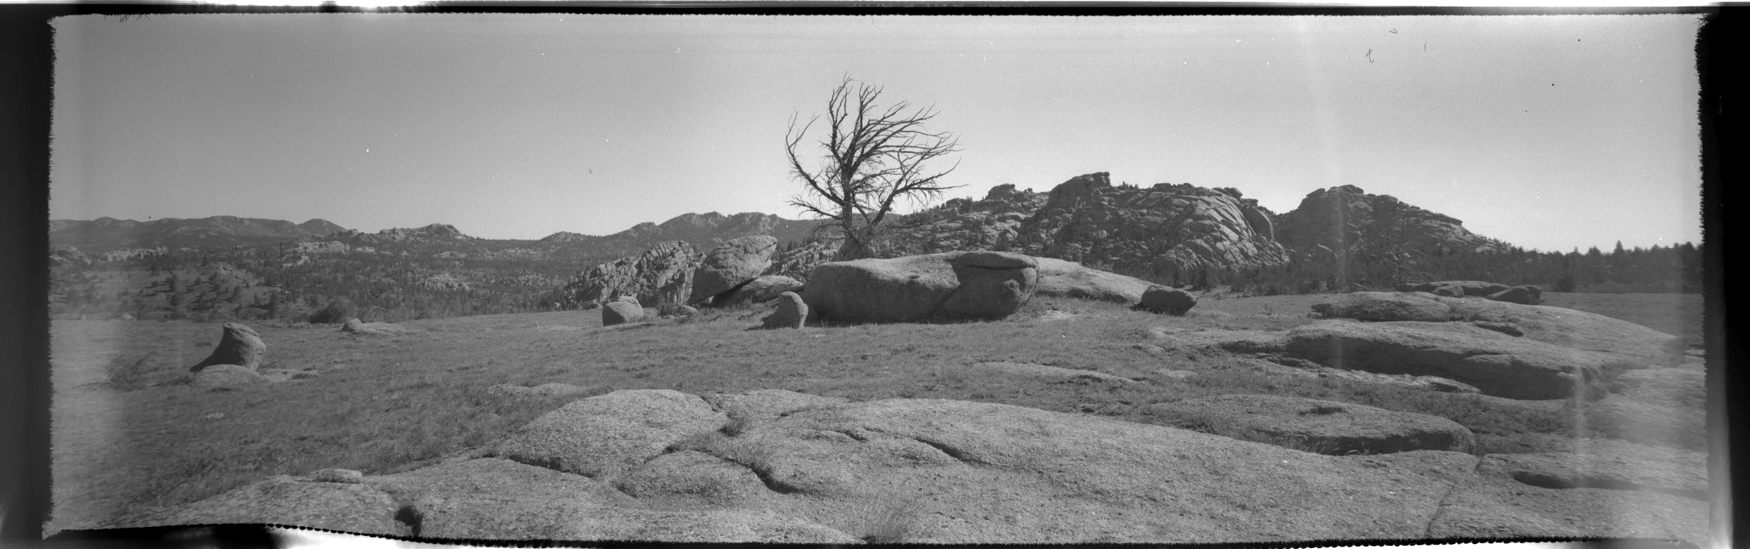
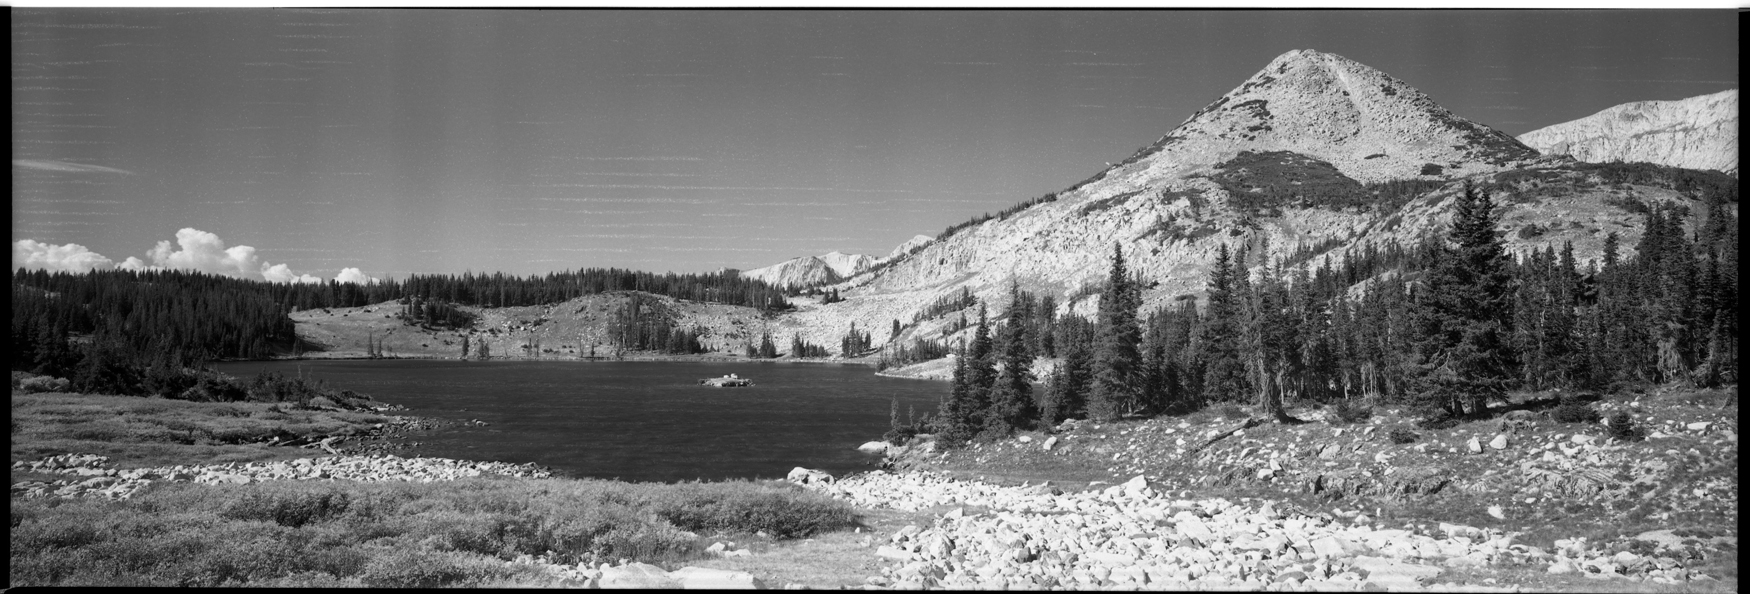
The focus system with the 90mm allows me to focus from 10 feet to infinity. At f/22 everything from 4 feet to infinity is in focus. In the photograph above, the closest rock (on the right) is 5 feet from the camera.
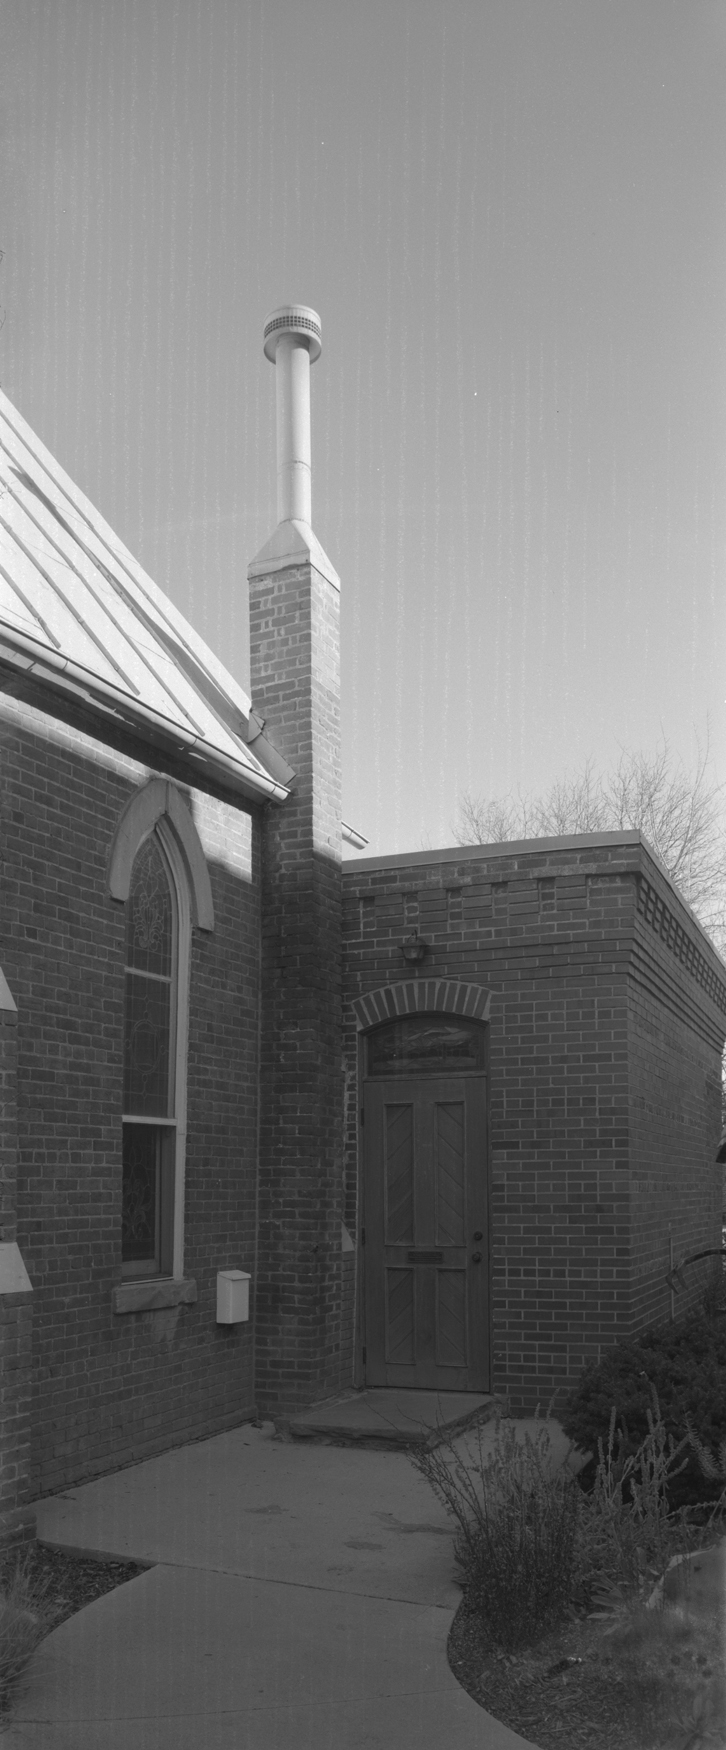
With the fixed focus 58mm, at f/32
everything in in focus.
At f/11, everything from 6 feet to
infinity is in focus.
In the end, this camera has come to
be a pleasure to use.
I find I don’t use the focus
adjustment for the 90mm lens very often; it is mostly set to infinity.
I have gotten used to the winding knob
on the left rather than the right of the camera.
I am also getting used the Fotoman
view finder, as well.
It isn’t exact framing, but for this
sort of camera, I don't find that to be a problem at all.
One thing that is becoming annoying
the more I use the camera is the way the back is attached to the camera.
The 6 wing-nuts that hold the back in
place have to be removed and replaced each time you change film.
With only 4 exposures per roll, I find
myself going through this painstakingly slow procedure often.
I have not lost a wing-nut yet, but I
am sure it is only a matter of time.
Eventually I will engineer a
new system for this, maybe using Velcro or springs or rubber bands.
As you can see in the photo of the
back of the camera, I have cobbled together a tape “door” for the film
number advance window.
I am not sure this is necessary, but
it is one of the many things I tried when eliminating light leaks, and
it also keeps dust and debris out of the camera, so I continue to use
it.
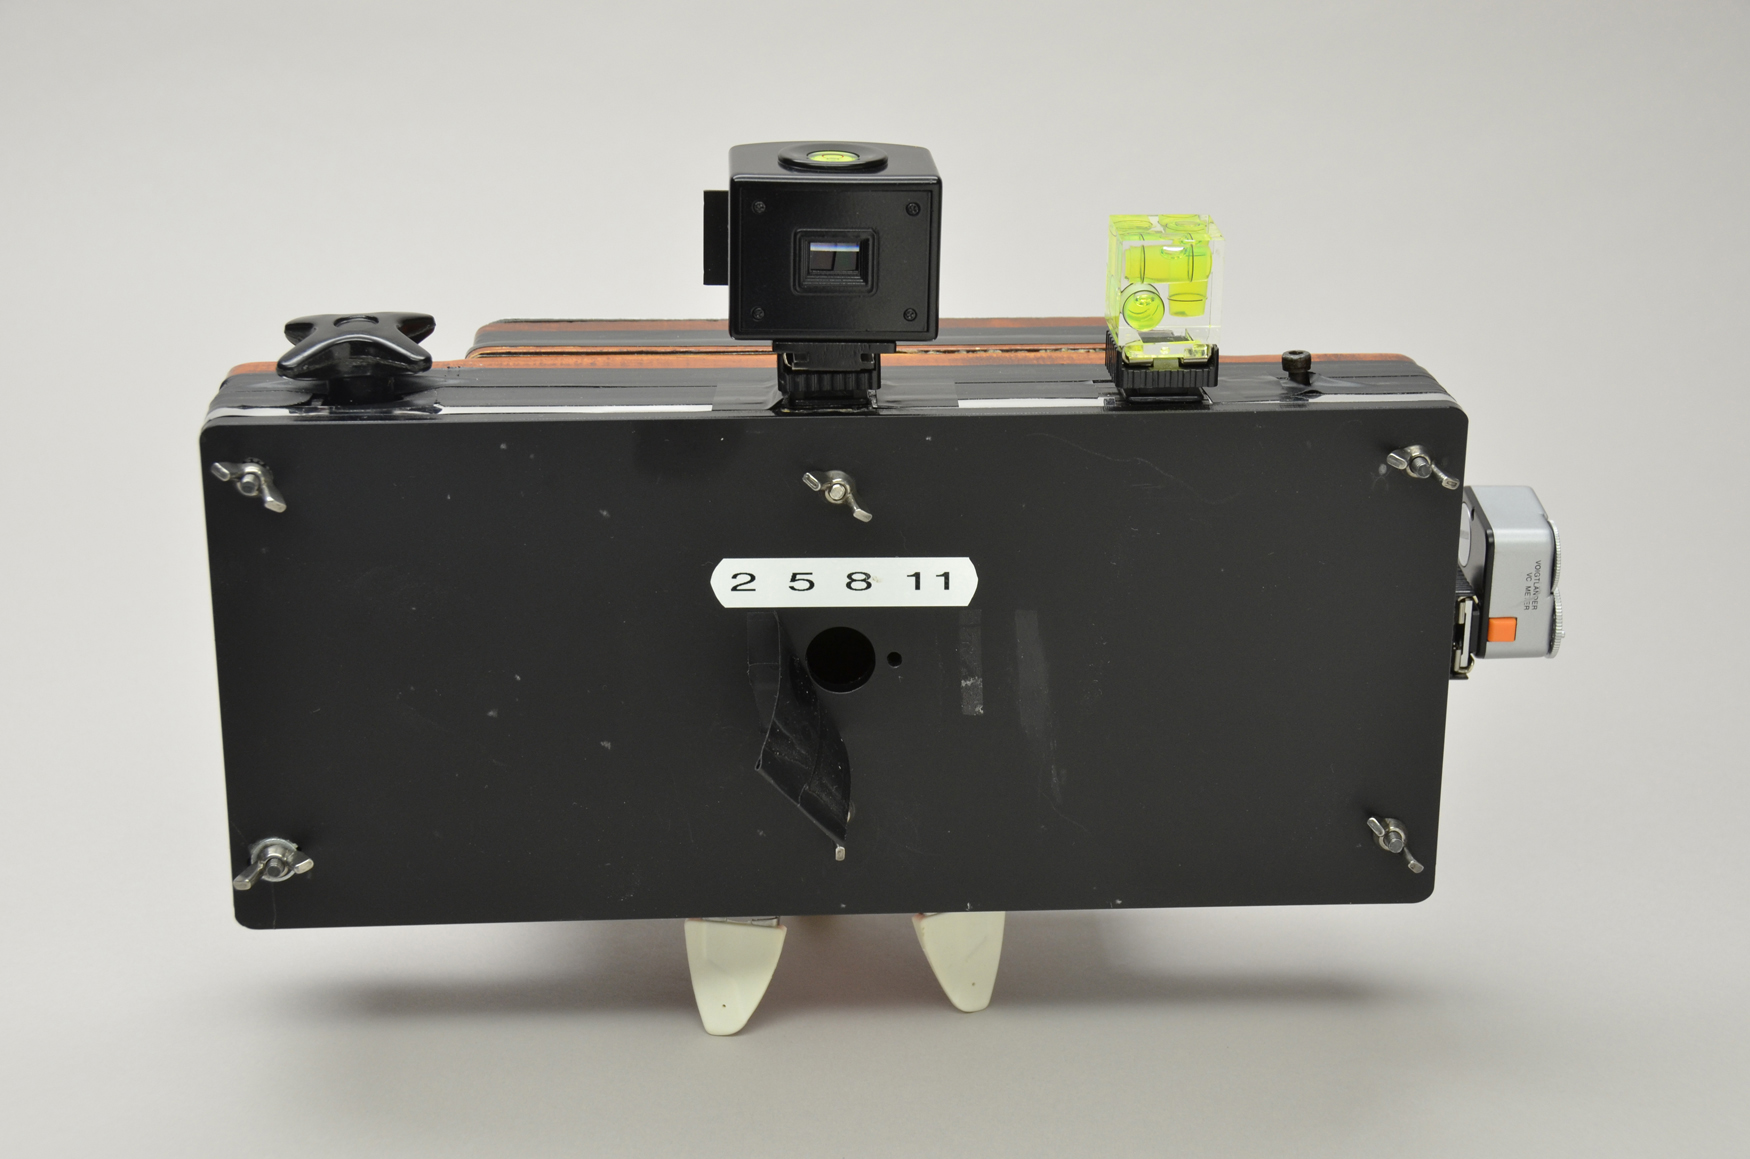
You’ll also notice a label with the numbers “2, 5, 8, 11” on it. These are the frame numbers that the film needs to be advanced to.
Frame 1:
wind to “2” Frame 2:
wind to “5” Frame 3:
wind to “8” Frame 4:
wind to “11”
The Voigtlander meter has been a
convenient addition, as is the three-way bubble level. I am actually
surprised how often I use the level.
This may be a carry-over from using my
Bomm 8x10 camera that has an attached two-way level.
For the price, this camera is a
terrific deal.
I did invest quite a bit of time
working out the issues, but if I were to buy another kit and do it
again, I suspect I would have a light-tight working camera on the first
try. I contacted the Two Fourths
folks when I started writing this article, and because of the turmoil in
the world, manufacturing the kit is on hold, and that is unfortunate.
For photographers who enjoy building
and a bit of a challenge, this project can be a lot of fun.
My timeline was far too long,
partially due to my stubbornness, and partially due to my mistakes when
analyzing the problems I found in testing.
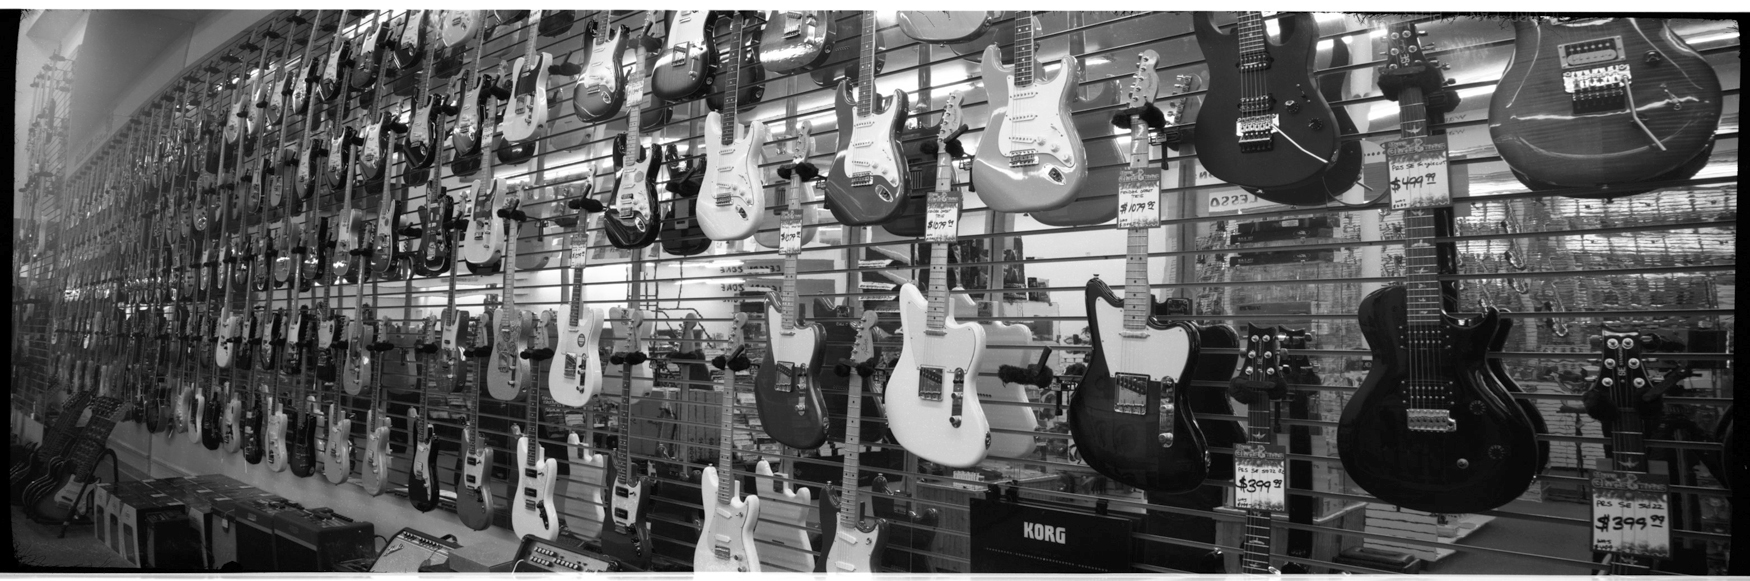
The images I make with this camera
are very satisfying on several levels.
Technically, the images are in focus
and fog free, and due to the climate where I live, this camera’s
aerodynamics are a big plus.
Aesthetically, the pecan finished wood
and brass look lens boards fit the nature of this camera.
Photographically, the format is terrific and the wide lenses have a
special look that suit my eye, and overall, this camera is quite easy to
use.
Personally, I enjoy when folks ask
where I got the camera, and the look they have when I tell them I built
it. It is a great source of pride for me.
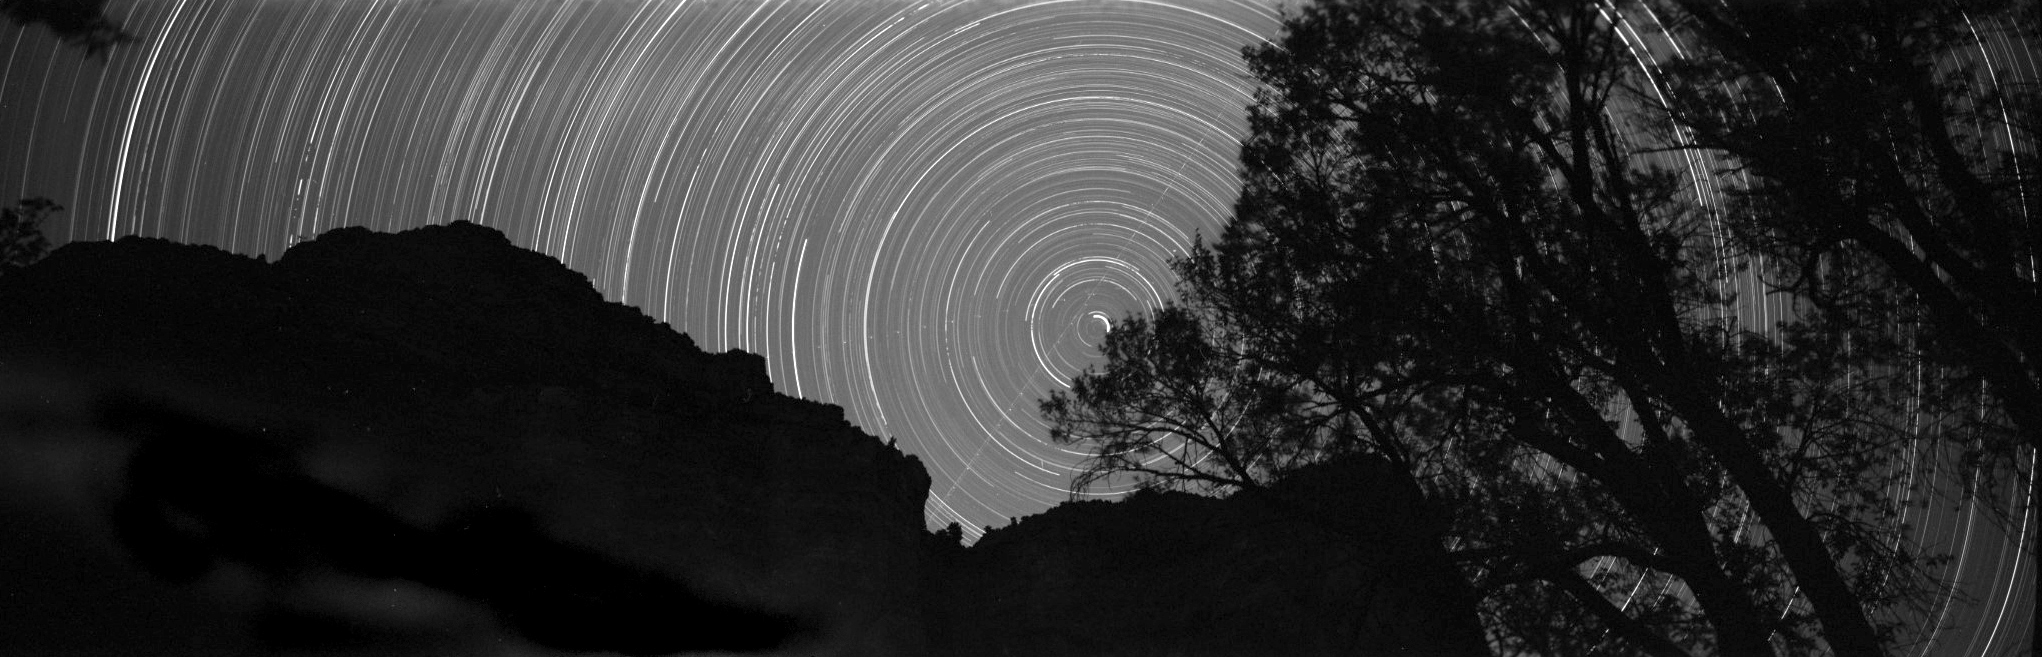
PS - This is a recent photo taken with the Two Fourths 617 camera. This was created in Tensleep Canyon Wyoming using The 90mm lens and Tri X film. This is an 8 hour exposure at f/8